Fitting a safe, efficient diesel heater to your vessel makes winter boating much more enjoyable – and doing so is not beyond the DIY installer.
When winter starts to really bite, many boaties dramatically reduce their boating time. Even on those occasional days when there are clear skies, single-digit temperatures put most people off getting out on the water. Which is a pity, because there are stunning days to be had for folk hardy enough to dress appropriately and head out into the wild blue yonder.
Except it is not always necessary to be immune to the cold or add layers until you look like the Michelin Man. At home we would turn on the heater or fire up the wood-burner or gas fire, and soon enough we’d be toasty warm. Why can’t we do the same on our boat?
Well, it turns out we can, with some careful planning and the right product to install.


Unless you have a large launch with a genset, a domestictype electric fan heater is seldom the best option. It turns out that converting electricity directly into heat is not very efficient, and a standard 2000-watt mains-powered heater would be drawing somewhere around 180 amps off a 12-volt system. Very few house batteries could sustain this sort of current draw for more than a few minutes. And an energy-efficient heat pump is simply too big and complex to fit on most boats.
So, a fuel-powered heater is what is needed, and the most convenient options for fuel sources are LPG or diesel. Stand-alone gas heaters are readily available for the domestic market, and they’re cheap, but are not recommended for use in an enclosed boat cabin. Carbon monoxide is the main risk, although this can be mitigated by plumbing in a system with adequate ventilation. However, the fire hazard from highly combustible fuel is another reason to avoid gas-fired heaters.
Which leaves diesel-powered heaters – and the number of available options has surged in recent years. Diesel has the advantage of not being very volatile, so the risk of fire is low. Most launches and yachts already have a diesel tank for the main engine, although the recommended installation option for most units is to run the heater off a small auxiliary fuel tank, making them equally suitable for petrol-fuelled vessels.
After experiencing a couple of heated boats, I decided to install a suitable unit as part of my boat rebuild. There are several options, depending on the space available and your budget. If you have a larger boa, and also want to incorporate on-demand hot water, then the Hurricane Hydronic heating system (available from So-Pac Marine in Auckland) is the way to go. These provide both water heating and multiple outlets of ducted warm air. Their price and size, however, means they are probably suited to larger boats with multiple cabins.


Another option popular in Europe is a space heater, looking a bit like a small wood-burner stove. Sig Marine, also distributed locally by So-Pac, make a neat little stainless-steel unit which can operate in a naturally ducted mode. This requires no power to run once it is ignited and is also very quiet, making it popular with cruising yachts and liveaboards. These heaters require open space around the unit so are ideal for fitting into the saloon of a larger vessel.
But by far the most popular option is a compact diesel air heater. These feature a fully enclosed combustion chamber that can be hidden away, the warm air ducted to where it is required. A popular option is to place an outlet blowing air onto the windscreen, to clear away fogging on cold mornings. The combustion gases from the diesel in these units is fully vented outside the boat. There is therefore no possibility of toxic gases or any smelly fumes getting into the cabin.
I decided to go with the compact air heater option, since I could locate the heater body inside one of the hulls of my aluminium catamaran. There is a huge range of brands and models available, from cheap Chinese versions through to German-made marine-grade options designed specifically for a boat. You get what you pay for – the cheap versions will have non-stainless fittings and cheap plastic parts, will likely be noisy when operating, and will probably only last a year or two. These have also been implicated in carbon monoxide poisonings – you will need to be extra-cautious that the exhaust system has no leaks.
On the other hand, the well-engineered European models will provide decades of troublefree use, operate safely, and run almost silently when properly installed.
Regardless of brand, these heaters all operate in a very similar manner, and their installation is pretty much the same.
Firstly, I needed to find a suitable location for the heater body, but I had masses of space inside the forward sections of the hulls. Most boats have a compartment somewhere that can be used, such as under a gunwale where the extra heat will not cause any issues. The body of the unit is surprisingly small, so it does not require a lot of room, although some airflow around the unit is recommended.
A metal plate forms the basis of the mounting. I found a suitable location forward inside my port-side hull, above the waterline and with space for the air intake and exhaust hoses to come up from the bottom of the plate. The unit needs to be installed approximately level, although this is not critical.


The next important consideration was the location of the hull fitting for the exhaust. The exhaust must be vented outside, ideally lower than the combustion module so any condensation can drip out. It also needs to be high enough that there is no chance of any water ingress and located in a heattolerant location to handle very hot exhaust gasses. The kit comes with corrugated stainless tubing for the exhaust, and a length of softer flexible hose for the intake. The whole exhaust gets pretty hot, so the flue should be as short as possible and shouldn’t touch any part of the boat between the combustion unit and exiting the hull. In addition, to avoid any possibility of carbon monoxide escaping into the hull, the exhaust tube should be a single piece without any joins.
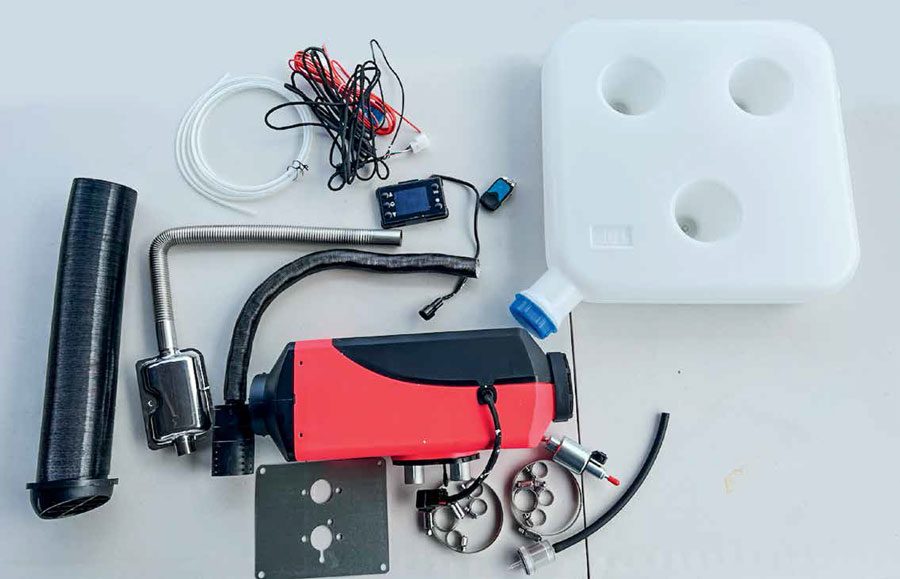
I found a spot where I could mount the exhaust vent so it faced the stern of the boat, then fitted a stainless steel clamshell cover over it to prevent any rain or spray getting in. The unit needs a diesel fuel source and the kit includes a 10-litre plastic fuel tank, plus suitable fuel pipe. Moulded indents in the tank allow coach screws to be used to attach it to a bulkhead – I planned to install it onto a piece of marine plywood close to a deck hatch where I can easily top up the fuel.
And the very last item is the control box. The cheaper models have a simple on/off and fan speed control. The better kits have full thermostatic control so you can set the desired internal temperature – the system will automatically adjust its output as required. Some kits also include a remote control. My unit came with a colour digital LCD display, and for ease of installation I will simply mount this against the cabin side above the main unit.
So, having worked out where to fit everything, I began the actual installation. Securing the main unit in the port hull required fabricating a sturdy bracket to attach to one of the internal stringers. Then the unit was bolted to this, and the hoses were connected. The air inlet was connected to the supplied filter and placed in the hull void to suck air from there. The exhaust tube was carefully bent and routed to connect to the stainless-steel hull fitting, which was sealed to the hull with high-temperature silicone sealant.
The fuel tank was installed on the piece of marine ply and the in-line filter and fuel pump fitted to the hose between the fuel tank and the combustion unit using the supplied fuel hose and jubilee clamps. The fuel pump comes in a rubber shock absorbing mount, which I mounted against another piece of marine ply. This should further isolate the pump from the hull, helping to minimise vibration.
Almost done. I ran the control cables under the deck and up to the side of the cabin. I will mount it permanently later. I am still finishing the interior layout, which also means I’m not yet ready to mount the vent outlets. I will also be installing a carbon monoxide alarm on board, just to be extra sure.


After connecting the 12V supply up to the power cable, it was time to test everything. I put some clean diesel into the tank and powered up the unit. Since this was a new installation, I needed to prime the pump first, and the instructions were not particularly clear! Fortunately YouTube has numerous helpful videos, so I soon worked out what was required.
After that the operation of the unit is easy enough – the “on” button is pressed for a few seconds to get the unit to start, and a longer press on the same button turns it off. Up and down arrows change the output level, and the controller displays the current status of the unit and cabin’s internal air temperature.
When the unit is turned on, the glowplug must heat the diesel for a few seconds before it will ignite. At first the unit blew only cold air but within five minutes there was toasty warm air coming out the vent. There are various settings available, including manual mode where you control the output, thermostat mode. where it slows down the output when the target temperature is reached, and timer mode, when it runs for a specified period and then automatically shuts off.
The whole job took about five hours, but nearly half of that was spent fashioning and welding a mounting bracket to hold the main unit. Apart from the cost of the kit, I purchased a stainless steel through-hull fitting for the exhaust, a stainless clamshell cover, and a longer piece of exhaust pipe. And the only other gotcha is that when you turn off the unit the fan remains on for about five minutes as the combustion chamber cools down.
Now I can look forward to plenty of warm boating through the winter. BNZ